
In this post I will be making another view and tell you how to navigate from first view to the one we are going to create now. Please refer my previous post as I am going to add code to the same project.
So, this time we will be creating a complete tableView and populate it with some data. We created a button last time "Hit Me". We will add code so that when user presses it, the new view gets displayed.
To start, right click on the classes folder in the left column of your xCode and select add>new file.
Chose the "UIViewController subclass" template and name it as MyTableView. This will add 2 files in the project namely MyTableView.h and MyTableView.m.
Now open MyTableView.h and add the follwing code:
As you can see we have added a UITableView object as a property to this viewController class
Now we should create and add this tableView to the view. So open MyTableViewController.m and add the following code to -(void)loadView method.
Most of the lines in code are self explanatory but I will discuss few of them.
aTableView.delegate = self;
aTableView.dataSource = self;
These lines tell that all the delegate methods of tableView will be implemented in this class only. Similarly the data source is set to self.
self.view = aTableView;
Hmmm..this time we have now added a UI element as a subView as we saw in the last post but instead we are making it the base view it self. I did this because I want the table to cover the whole screen in the application, i.e. I am not going to put any other UI elements so why not make it the base view itself. That ways I dont have to define the frame(coordinates and size of table). I will discuss how to add a table view as a sub view in next post where a table will just be covering a small portion of screen and will have its own scroller.
Now, we have created a tableView and made it as the base view. But what does this table display? We are now going to do the same thing now. For that we need to implement the delegate methods of UITableView. If you remember the interface definition in MyTableView.h was like @interface MyTableView : UIViewController {
In triangular brackets we tell that what are the protocols that this class will be adhering to.
I just hope you have read ObjC properly to understand what I said.
Anyways, in the MyTableView.m file add that following code
Now, three methods, which are automatically called define how the table will look like and what data it will display.
UITableViewCell *cell = [tableView dequeueReusableCellWithIdentifier:MyIdentifier];
if (cell == nil) {
cell = [[[UITableViewCell alloc] initWithFrame :CGRectZero reuseIdentifier:MyIdentifier]autorelease];
So what is this dequeReusableCell? Why can't we just create a cell by alloc and init? We can do that but there is something you should always keep in mind. This method is called every time you scroll the tableView and a new cell which was not visible earlier gets visible. Imagine you have 20 cells in the table and iPhone can display only 19 on full screen. So the 20th cell will be created by cellForRow method only when it gets visible on the screen. But then the first cell will go out of view ryt? When you scroll back to view the first screen, cellForRow method will be called again to to return a cell to be displayed at first place. That's why we use dequeReusablelCell so that it doesn create a new cell every time.
CAUTION: Do not do anything stupid inside cellForRow method cuz it gets called multiple times.
Finally we have created the view and are ready to use it. What we want is that the new view should appear when we click the "Hit Me" button we created earlier.
So open MyTestProjectViewController.h and modify it to look like this:
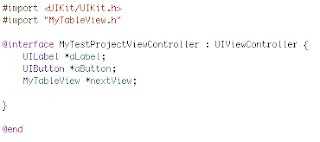
We have only defined an instance of MyTableView here, to create it and push it on button click
open MyTestProjectViewControler.m and modify buttonPressed method we created earlier to look like this:
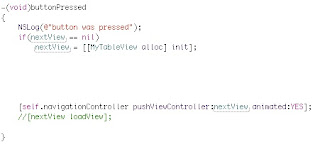
Here we are creating an instance of MyTableView and pushing it over the view which we are looking at now.
If you build this project and run it, you will see the same screen as we saw last time, on pressing the button you will notice that nothing happens. If you chose "navigation based" template when creating the project last time this code would have worked, but since we chose "view based" template its not working. This is the reason why I picked this template so that we can learn how we can programatically do any this we want.
The reason why the new view is not getting pushed is that there is no navigationController attached to the originalView. To do so open MyTestProjectAppDelegate.m and find a method named - (void)applicationDidFinishLaunching:(UIApplication *)application
Add the code to make it look like this
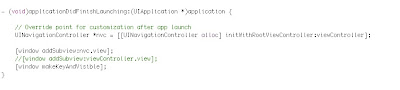
Here we have created a navigation controller and initialized it with the root view as MyTestProjectViewController. So now our original view has a navigation controller and it can push any view over it.
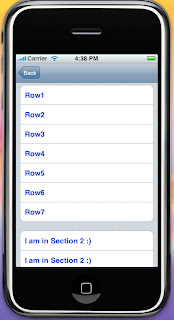
Now if you build and run the project, you can see the new screen containing a tableView on pressing the "Hit Me" button.
In the next post I will be creating a customized view with a table and a few other UI elements on the same page. This will be my favorite post as I could not find this thing using google.
Also I will be creating App Settings in the same project which will work as dataSource for the new view we will be making.
Lemme know if I have been missing something in this post. Till den good luck.


Hey nice tutorials. I can't seem to get a large copy of the screen-capture-5.jpg image. The small one is far to poor of quality to see the code. All the others are OK
ReplyDeleteAhh..I can see that, I am replacing it..thanks Phil for notifying.
ReplyDeleteDustin, was out for my convocation, have started writing the next post.
thx n regards
Thanks. Will go and finish the last part of the tutorial now. It was been very helpful!
ReplyDeleteI saw in the earlier tutorial that you don't like to use the Interface Builder to create the views. I can understand why. I think it would be really helpful to do a mirroring tutorial of this one using the Interface Builder so people can see the difference between the two methods.
I haven't seen anyone do this and think it would be a great benefit to the iPhone Dev community
Thanks
Phil
Phil: You can either select "console" from the Run menu of xCode or you can use the shortcut "Shift + Window + R"
ReplyDeleteall the NSLog outputs are streamed to console by default.
Regarding IB, i think every one should try both the methds cuz that gives a clearer insight.
Regards