Tuesday, February 3, 2009

iPhone Development: Application Preferences Part 2

In this post I will be using PSChildPaneSpecifier in the application preferences.
You should read part 1 of this post if you are not familiar with application preferences. You can find it here .

What does PSChildPaneSpecifier do? It adds another page of configurations into your settings. We do that when we have a large number of configurations, so we divide them into categories and make a child pane of each category. 

A child pane is nothing but another plist file. So to start with, open the same project "MyTestProject", right click on Settings.bundle and select "add new". From the "Other" tab select plist file as shown below:


Name the file as "Child.plist". You will notice that child.plist file is not added in the Settings.bundle. You need to add it inside Settings.bundle which will be done from the terminal.

To do so, open Terminal and navigate to your projects directory. Execute "ls" on shell to cross verify that you are in the correct directory. Following should appear on the Terminal:


Now copy child.plist file into the Settings.bundle by following command: "cp child.plist Settings.bundle". Cross verify by navigating into Settings.bundle directory and executing "ls". child.plist file should show up. 

Close the terminal now and come to xCode again. You will now find child.plist inside Settings.bundle. Double click Child.plist and add items to make it look like this:


We have created the new child plist file, now we need to add a reference to it in the root.plist file. Open root.plist and add 2 new items to make it look like this.


Build and run the application , go to the settings and select your project MyTestProject. It shold look similar to the following:


In next post I am going to access these preferences from the MyTestProject and also allow the user to change them from the View itself.

`
`
`
`
`
`


iPhone Development: Application Preferences

Here I am going to discuss Application Preferences. For those who are unaware of it, Application preferences refers to the configurations that shows up in the Settings. So if you want you application name to be listed inside Settings, you need to follow the procedure.

Lets first discuss what are the available options. Since we know in iPhone all applications work in a sandbox mode, we can not write a program to alter the behavior of another program. What it means here is, there are fixed UI Elements that can be used in Application preferences, their behavior is also fixed and cannot be changed. For example a you cannot provide a date picker in the settings, you cannot pop up a message saying the URL you entered is not correct. All you can do is provide a field where user can enter his preferences.

Following is a list of options we have for UI elements that we can provide:

  1. PSTitleValueSpecifier: Used to write titles, similar to UILabel
  2. PSTextFieldSpecifier: Similar to UITextField
  3. PSToggleSwitchSpecifier: A toggle switch which can be ON or OFF
  4. PSSliderSpecifier: A slider which can be used to provide a value bw MAX and MIN
  5. PSMultiValueSpecifier: Shows multiple values from which user can select one.
  6. PSGroupSpecifier: Very important for layout (discussed later).
  7. PSChildPaneSpecifier: When you need to have another page of configurations.
All these elements can be used in the settings and you can read as well as manipulate them from your code.

Lets start the procedure. Open the same project "MyTestProject" we have been using last time. right click on the resources folder in left pane and select addNew. In the new window select Settings.bundle as shown in the figure.


Name it as Settings.bundle and click OK. This will create a Settings.bundle in your resources folder. Expand Settings.Bundle and double click on  Root.plist.

By default it should look like this: 

Right click on Preference Specifier and select "cut". I did this because in all my tutorials I do not rely on any convenience/ default things provided. It helps later in customizing things the way you want. Any ways now click on the  "+" button on the right side of the table and in place of "new Item" type PreferenceSpecifiers. In the type field corresponding to PreferenceSpecifiers, select "Array".

Now we will add one by one all the elements we listed earlier. Click on the Arrow symbol to the left of PreferenceSpecifiers to expand it. You will notice that the "+" image on right has now changed and it shows 3 lines. Click on it to add a child which will automatically be named as "Item 1". In the Type select "Dictionary". 
Now expand "Item 1" and add a child element to it, name it as "Title". Type should be "String" and in the Value write "URL".
Add more childs and make the plist file look like this:


Now Click on the arrow against "Item 1" to hide its child elements, click on "Item 1" (not on the arrow) and click on "+" button on right. This should show "Item 2" below "Item 1". Follow the last step correctly else you will end up wondering why I am not able to add a child or a new item at the place I want.

Add more items to make it look like this: 


Now build and run your project, go to Settings and find you applications' name there, clicking on it should show a screen like this:


I have only used three types in the preferences. In next post I will be using PSChildPaneSpecifier and add remaining of the elements i.e. PSTitleViewSpecifier, PSSliderSpecifier and PSGroupSpecifier.

Do not forget to mention name of your project "MyTestProject" against "Title", the second field from top in the pList file. 

An important thing to remember: "+" button in plist file adds a sibbling and the button with 3 lines adds a child.

If you faced any problem in creating child elements or new Items at the specific place in the plist file, don't worry, you just need to expand/hide elements properly. If you still face any problems, lemme know and I will be more than happy to help.

Topics of next post:
  1. Using PSChildPaneSpecifier and adding rest of the types.
  2. Accessing application preferences from inside your code
  3. Changing preferences from your code.
Also in next post we will be creating a custom TableView and custom Cells to display the application preferences in the form of a SetUp Wizard (all by writing code and not using Interface Builder).


Tuesday, January 20, 2009

iPhone Development: Navigating from 1 view to other


In this post I will be making another view and tell you how to navigate from first view to the one we are going to create now. Please refer my previous post as I am going to add code to the same project.

So, this time we will be creating a complete tableView and populate it with some data. We created a button last time "Hit Me". We will add code so that when user presses it, the new view gets displayed.

To start, right click on the classes folder in the left column of your xCode and select add>new file.
Chose the "UIViewController subclass" template and name it as MyTableView. This will add 2 files in the project namely MyTableView.h and MyTableView.m.

Now open MyTableView.h and add the follwing code:


As you can see we have added a UITableView object as a property to this viewController class

Now we should create and add this tableView to the view. So open MyTableViewController.m and add the following code to -(void)loadView method.

Most of the lines in code are self explanatory but I will discuss few of them.

aTableView.delegate = self;

aTableView.dataSource = self;
These lines tell that all the delegate methods of tableView will be implemented in this class only. Similarly the data source is set to self.
self.view = aTableView;
Hmmm..this time we have now added a UI element as a subView as we saw in the last post but instead we are making it the base view it self. I did this because I want the table to cover the whole screen in the application, i.e. I am not going to put any other UI elements so why not make it the base view itself. That ways I dont have to define the frame(coordinates and size of table). I will discuss how to add a table view as a sub view in next post where a table will just be covering a small portion of screen and will have its own scroller.

Now, we have created a tableView and made it as the base view. But what does this table display? We are now going to do the same thing now. For that we need to implement the delegate methods of UITableView. If you remember the interface definition in MyTableView.h was like @interface MyTableView : UIViewController {
In triangular brackets we tell that what are the protocols that this class will be adhering to.
I just hope you have read ObjC properly to understand what I said.

Anyways, in the MyTableView.m file add that following code


Now, three methods, which are automatically called define how the table will look like and what data it will display.


UITableViewCell *cell = [tableView dequeueReusableCellWithIdentifier:MyIdentifier];

if (cell == nil) {

cell  = [[[UITableViewCell alloc] initWithFrame :CGRectZero reuseIdentifier:MyIdentifier]autorelease];

So what is this dequeReusableCell? Why can't we just create a cell by alloc and init? We can do that but there is something you should always keep in mind. This method is called every time you scroll the tableView and a new cell which was not visible earlier gets visible. Imagine you have 20 cells in the table and iPhone can display only 19 on full screen. So the 20th cell will be created by cellForRow method only when it gets visible on the screen. But then the first cell will go out of view ryt? When you scroll back to view the first screen, cellForRow method will be called again to to return a cell to be displayed at first place. That's why we use dequeReusablelCell so that it doesn create a new cell every time.

CAUTION: Do not do anything stupid inside cellForRow method cuz it gets called multiple times.


Finally we have created the view and are ready to use it. What we want is that the new view should appear when we click the "Hit Me" button we created earlier. 


So open MyTestProjectViewController.h and modify it to look like this:
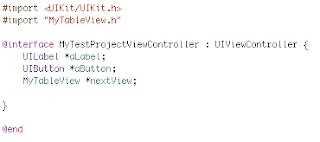


We have only defined an instance of MyTableView  here, to create it and push it on button click

open MyTestProjectViewControler.m and modify buttonPressed method we created earlier to look like this:
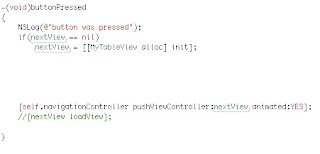

Here we are creating an instance of MyTableView and pushing it over the view which we are looking at now.

If you build this project and run it, you will see the same screen as we saw last time, on pressing the button you will notice that nothing happens. If you chose "navigation based" template when creating the project last time this code would have worked, but since we chose "view based" template its not working. This is the reason why I picked this template so that we can learn how we can programatically do any this we want.

The reason why the new view is not getting pushed is that there is no navigationController attached to the originalView. To do so open MyTestProjectAppDelegate.m and find a method named  - (void)applicationDidFinishLaunching:(UIApplication *)application

 Add the code to make it look like this
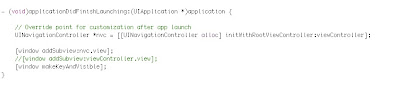


Here we have created a navigation controller and initialized it with the root view as MyTestProjectViewController. So now our original view has a navigation controller and it can push any view over it.

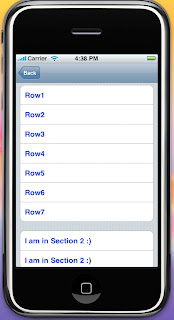
Now if you build and run the project, you can see the new screen containing a tableView on pressing the "Hit Me" button.

In the next post I will be creating a customized view with a table and a few other UI elements on the same page. This will be my favorite post as I could not find this thing using google.
Also I will be creating App Settings in the same project which will work as dataSource for the new view we will be making.

Lemme know if I have been missing something in this post. Till den good luck.


iPhone Development: Creating a Simple View

In this post I will create a simple view with a label and a button. The Label says Hello World and a Button which says Hit Me, when clicked prints a log statement on console.

I am going to use this project in all my next posts where I will be building complex views, custom table views with custom cells, animations, webViews etc.

The application I am going to build will finally look like this


So open the xCode and create a new project. Chose the template "View Based" and name the project as "MyTestProject"
This will open a new project with may folders appearing on the left side of xCode. Expand the classes folder and select MyTestProjectViewController.h. Add the following code to it:


We have defined a label and a button in the header file. In the implementation file we will create them and finally add it to the baseView. So open MyTestProjectViewController.m and add following code within the implementaion declaration i.e. after
@implementation MyTestProjectViewController.


Most of the lines in code are self explanatory. I will explain some of them:
aLabel = [[UILabel alloc]initWithFrame:CGRectMake(90,100,200,40)];
here you are actually creating a Label and initializing it with a frame. A frame represents the lay out of a UI element. The first 2 arguments of CGRectMake are (x,y) coordinates from where the label will appear. The last 2 arguments are (width,height) size and they define how much space will they be taking on the view.

[aLabel setBackgroundColor:[UIColor whiteColor]];
Yes a label also has a background color. When you define a frame, you are creating a rectangle with its left corner at the (x,y) and right corner at (x+width, y+height). The label (or any UI element) lies inside a frame. The background color of a label is the color with which this rectangle will be filled.
[aButton addTarget:self action:@selector(buttonPressed) forControlEvents:UIControlEventTouchUpInside];

Now in this line we are telling what a button should do on being pressed. addTarget:self tells that the event will be handled by the same class in which it is being declared. 
action:@selector(buttonPressed) tells that when the button is touchedUPInside this method should be called automatically.

-(void)buttonPressed

{

NSLog(@"button was pressed");

}
Finally we have implemented the method which will be called automatically when the button is pressed. You can write anything inside this method.

I have not used Interface Builder at all. For me IB is a pain in the as* . If you want to do some serious development you need to learn how every thing is done programatically. In the next post I will be creating another View and add some more Elements to it and we will be adding code for navigating from one view to the other.

Let me know if there is any specific issue. 


iPhone Development: Customizing HeaderView


This post will discuss how we can add a headerView to a UITableView and customize it.
The tableView will finally look like in the above figure. The headerView is the 30 pixel bar just below navigationBar and it reads "Last Synch ..."

How you make a tableView can be found anywhere on Internet, so I ll assume that you know how to make a tableView.

Open the viewController in which you have created your table and add the following code in header file within the interface declaration:

UIView *myHeaderView;


Now open the viewController in which you have created your table and add the following code in implementation file


I have created a method that will create and customize the headerView. You can call this method from viewWillAppear method.

Comments will be appreciated, if you still face any difficulty in creating a headerView, leave a comment and I will be more than happy to address it.