Tuesday, April 28, 2009

iPhone Development: Custom Cells

Ohhk, quite a lot of things done but this one is something which I have used most often. Custom cells can sometimes greatly push ahead the usability of the application. In this post I am going to create a test project which will demonstrate how to create custom cells and use them appropriately to provide better usability. The application will finally look like this:


So to start open xcode and create a new project, chose the template as "Navigation Based" and  name it as "CustomCellTestProject". What template you chose does not matter, refer my previous posts to find how you can start working on any template.
First thing we will do is create a customCell. Right click on Classes and add a new UITableViewCell subclass. Name it as "CustomCell". Now open CustomCell.h and add the following code:

#import


@interface CustomCell : UITableViewCell {

UILabel *primaryLabel;

UILabel *secondaryLabel;

UIImageView *myImageView;


}

@property(nonatomic,retain)UILabel *primaryLabel;

@property(nonatomic,retain)UILabel *secondaryLabel;

@property(nonatomic,retain)UIImageView *myImageView;

@end


Here we have simply added a primary label to display the primary text, a secondary label and an imageView. These elements will be created and added into the content view of our custom cell. So open CustomCell.m and add the following code

- (id)initWithFrame:(CGRect)frame reuseIdentifier:(NSString *)reuseIdentifier {

    if (self = [super initWithFrame:frame reuseIdentifier:reuseIdentifier]) {

        // Initialization code

primaryLabel = [[UILabel alloc]init];

primaryLabel.textAlignment = UITextAlignmentLeft;

primaryLabel.font = [UIFont systemFontOfSize:14];

secondaryLabel = [[UILabel alloc]init];

secondaryLabel.textAlignment = UITextAlignmentLeft;

secondaryLabel.font = [UIFont systemFontOfSize:8];

myImageView = [[UIImageView alloc]init];

[self.contentView addSubview:primaryLabel];

[self.contentView addSubview:secondaryLabel];

[self.contentView addSubview:myImageView];

    }

    return self;

}


We create the three elements and added them to the contentView of our cell. Also don't forget to synthesize all the three elements as we are going to access these elements from other classes.

@synthesize primaryLabel,secondaryLabel,myImageView;


Now, we have already added the UI elements into our cell but you must have noticed, we have not yet defined how these elements will appear inside cell. Go ahead and add the following code for that:

- (void)layoutSubviews {

     [super layoutSubviews];

CGRect contentRect = self.contentView.bounds;

CGFloat boundsX = contentRect.origin.x;

CGRect frame;


frame= CGRectMake(boundsX+10 ,0, 50, 50);

myImageView.frame = frame;

frame= CGRectMake(boundsX+70 ,5, 200, 25);

primaryLabel.frame = frame;

frame= CGRectMake(boundsX+70 ,30, 100, 15);

secondaryLabel.frame = frame;


}


You can do anything in this method to define the lay out of cell. I have simply assigned frames to all the elements.
You can also find a method in CustomCell.m

- (void)setSelected:(BOOL)selected animated:(BOOL)animated {


    [super setSelected:selected animated:animated];


    // Configure the view for the selected state

}


This method can be used to define how your cell should react when it is selected. You can describe what should be the highlight color or may be you want to flash one of the labels anything of your choice. I am leaving this method as it is.

We are done with creating our custom cell and now we have to use it. Open RootViewController.m and import CustomCell.h at the top.


#import "CustomCell.h"


I am going to create 5 cells here, you can just use your own logic of specifying number of cells and data. So change the following method to look like this:

- (NSInteger)tableView:(UITableView *)tableView numberOfRowsInSection:(NSInteger)section {

    return 5;

}


Now we are going to use our custom cell. If you look at the cellForRow method, you will find that a UItableViewCell has been created and re used. Now all we have to do is to replace this cell with our new cell. Change the code inside this method to look like this: 

- (UITableViewCell *)tableView:(UITableView *)tableView cellForRowAtIndexPath:(NSIndexPath *)indexPath {


    static NSString *CellIdentifier = @"Cell";


    CustomCell *cell = [tableView dequeueReusableCellWithIdentifier:CellIdentifier];

    if (cell == nil) {

        cell = [[[CustomCell alloc] initWithFrame:CGRectZero reuseIdentifier:CellIdentifier] autorelease];

    }


    // Set up the cell...

switch (indexPath.row) {

case 0:

cell.primaryLabel.text = @"Meeting on iPhone Development";

cell.secondaryLabel.text = @"Sat 10:30";

cell.myImageView.image = [UIImage imageNamed:@"meeting_color.png"];

break;

case 1:

cell.primaryLabel.text = @"Call With Client";

cell.secondaryLabel.text = @"Planned";

cell.myImageView.image = [UIImage imageNamed:@"call_color.png"];

break;

case 2:

cell.primaryLabel.text = @"Appointment with Joey";

cell.secondaryLabel.text = @"2 Hours";

cell.myImageView.image = [UIImage imageNamed:@"calendar_color.png"];

break;

case 3:

cell.primaryLabel.text = @"Call With Client";

cell.secondaryLabel.text = @"Planned";

cell.myImageView.image = [UIImage imageNamed:@"call_color.png"];

break;

case 4:

cell.primaryLabel.text = @"Appointment with Joey";

cell.secondaryLabel.text = @"2 Hours";

cell.myImageView.image = [UIImage imageNamed:@"calendar_color.png"];

break;

default:

break;

}

    return cell;

}


I have added some dummy data. You can use your data source to provide data for primaryLabel and secondaryLabel. Please note that I have used three images here. You can use any image of your choice. All you need to to do is copy the images and paste it into your project root folder (which in this case is CustomCellTestProject folder). After pasting the files, in xcode right click on Resources (or any group), select Add >> ExistingFiles and then select all the images you want to add in you project. Once added you can simply use them by their names.

Thats it, go ahead and run the project. You will find something wrong when you compare you simulator screen with mine. If you noticed in the CustomCell.m, I have given some frames to the UI elements. You need to make sure that the height of your cell large enough to accomodate all the elements. So add this following code and you fixed the issue:

- (CGFloat)tableView:(UITableView *)tableView heightForRowAtIndexPath:(NSIndexPath *)indexPath

{

return 50;

}


Let me know if I have been missing something here.


Thursday, April 9, 2009

iPhone Development: Creating Native Calendar Like View

In this post I will be creating a calendar, which could reused in an any native application.
I used the calendar source from here and modified it a little bit to suit my requirements.
You can find the modified code from my project here: DOWNLOAD PROJECT
The final screen should look like this:

You can download the complete project from the link given, I will only discuss how we can reuse this calendar and modify it to fit our specific requirements.
Open the project CalendarTest in xCode. You will find a folder Calendar containing some 20 files.
You can reuse this folder as such in any project you want show the calendar. I will be using these files to display a modified calendar in CalendarTestView header and implementation files.

Open CalendarTestView.m and find the following code:

- (void)loadView {

[super loadView];

calendarView = [[[KLCalendarView alloc] initWithFrame:CGRectMake(0.0f, 0.0f, 320.0f, 360) delegate:self] autorelease];

myTableView = [[UITableView alloc]initWithFrame:CGRectMake(0,260,320,160) style:UITableViewStylePlain];

myTableView.dataSource = self;

myTableView.delegate = self;

UIView *myHeaderView = [[UIView alloc] initWithFrame:CGRectMake(0,0,myTableView.frame.size.width , 20)];

myHeaderView.backgroundColor = [UIColor grayColor];

[myTableView setTableHeaderView:myHeaderView];

[self.view addSubview:myTableView];

[self.view addSubview:calendarView];

[self.view bringSubviewToFront:myTableView];

}


Here I have initialized a tableView and the calendarView with appropriate frames. You can change the frames if you want to change the respective size of tableView and/or calendarView.

Now find the Calendar Delegate methods:

- (void)calendarView:(KLCalendarView *)calendarView tappedTile:(KLTile *)aTile{

NSLog(@"Date Selected is %@",[aTile date]);

[aTile flash];

if(tile == nil)

tile = aTile;

else

[tile restoreBackgroundColor];

tile = aTile;

}


Here you need to write the code that should be executed when a tile is tapped. Typical usage of this method would be to load data for the tableView from database corresponding to the date of the tile.

- (KLTile *)calendarView:(KLCalendarView *)calendarView createTileForDate:(KLDate *)date{

CheckmarkTile *tile = [[CheckmarkTile alloc] init];

//tile.checkmarked = YES;//based on any condition you can checkMark a tile

return tile;

}


This method is called for each tile. Just like cellForRow is called for each cell. Please note that although this method will not be called more than once for a tile, but when you change the month of calendar, all tiles are redrawn, so this method will again be called for each tile.
You can find a commented line in this method! This is very important code which you can use to tell the user that they have some data corresponding to a date.
For example I have a meeting on 4th of current month. You can check if tile.date == 4th then check-mark the tile.

- (void)didChangeMonths{

UIView *clip = calendarView.superview;

if (!clip)

return;

CGRect f = clip.frame;

NSInteger weeks = [calendarView selectedMonthNumberOfWeeks];

CGFloat adjustment = 0.f;

switch (weeks) {

case 4:

adjustment = (92/321)*360+30;

break;

case 5:

adjustment = (46/321)*360;

break;

case 6:

adjustment = 0.f;

break;

default:

break;

}

f.size.height = 360 - adjustment;

clip.frame = f;

CGRect f2 = CGRectMake(0,260-adjustment,320,160+adjustment);

myTableView.frame = f2;

[self.view bringSubviewToFront:myTableView];

tile = nil;

}


This method is called every time you change the month in calendar. I have done some adjustments for fixing the free space between tableView and calendar when there are less number of weeks in a month. You can wrote your own logic for that.


Now the tableView delegate methods. You can write anything you want depending on your requirement. I have written some dummy code to take screen shots

#pragma mark tableViewDelegate Methods

- (NSInteger)numberOfSectionsInTableView:(UITableView *)tableView {

return 1;

}


- (NSInteger)tableView:(UITableView *)tableView numberOfRowsInSection:(NSInteger)section {

return 5;

}


- (UITableViewCell *)tableView:(UITableView *)tableView cellForRowAtIndexPath:(NSIndexPath *)indexPath {

static NSString *MyIdentifier = @"MyIdentifier";

UITableViewCell *cell = [tableView dequeueReusableCellWithIdentifier:MyIdentifier];

if (cell == nil) {

cell = [[[UITableViewCell alloc] initWithFrame:CGRectZero reuseIdentifier:MyIdentifier] autorelease];

}

cell.accessoryType = UITableViewCellAccessoryDisclosureIndicator;

[cell setText:@"No Data For Now"];

return cell;

}


You can read data from the source which maintains data according to the last tile tapped.

Let me know if I am missing something.

iPhone Development: Creating Native Contacts like screen

Hello again. This time I will be creating a native contacts like screen. If you are not familiar with it, here is how it looks like:


This view is very important for many business applications. There can be several ways of implementing this view, depending upon your specific need you can write one. I will discuss the simplest one in which I will be creating a dictionary to access names. I will be adding code to same DatabaseTest project which I created earlier. 
You can find DatabaseTest here

So lets start and open the project DatabaseTest. We need not change anything in AppDelegate. Open RootViewController.h and add the following code:

@interface RootViewController : UITableViewController {

//NSMutableArray *tableData;

NSMutableArray *arrayOfCharacters;

NSMutableDictionary *objectsForCharacters;

}


@end


You will notice that I have commented tableData and declared an additional array and a dictionary. We wont be using tableData anymore instead data will be now stored in dictionary objectsForCharacters. You will understand how in some time now.

Open RootViewController.m and in -(void)initializeTableData comment all the code written and add this code:

arrayOfCharacters = [[NSMutableArray alloc]init];

objectsForCharacters = [[NSMutableDictionary alloc]init];

sqlite3 *db = [DatabaseTestAppDelegate getNewDBConnection];

for(char c='A';c<='Z';c++)

{

NSMutableString *query;

query = [NSMutableString stringWithFormat:@"select name from user where name LIKE '%c",c];

[query appendString:@"%'"];

char *sql = [query cString];

sqlite3_stmt *statement = nil;

if(sqlite3_prepare_v2(db,sql, -1, &statement, NULL)!= SQLITE_OK)

NSAssert1(0,@"error preparing statement",sqlite3_errmsg(db));

else

{

NSMutableArray *arrayOfNames = [[NSMutableArray alloc]init];

while(sqlite3_step(statement)==SQLITE_ROW)

[arrayOfNames addObject:[NSStringtringWithFormat:@"%s",(char*)sqlite3_column_text(statement, 0)]];

if([arrayOfNames count] >0)

{

[arrayOfCharacters addObject:[NSString stringWithFormat:@"%c",c]];

[objectsForCharacters setObject:arrayOfNames forKey:[NSString stringWithFormat:@"%c",c]];

}

[arrayOfNames release];

}

sqlite3_finalize(statement);

}


I will explain what we are doing here. For each alphabetical character we are querying database to get all the names starting with that character. If we get 1 more or more names for a character, we add that character in an array arrayOfCharacters. Names are stored in a separate array arrayOfNames. This is a temporary array which will added to dictionary objectsForCharacters. At the end we have arrayOfCharacters holding all those characters which have at least one name starting with them respctively and we have objectsForCharacters holding an array of names for each character in arrayOfCharacters.

Now we need to fix the view. For this we will now be using 3 new tableView methods:

- (NSArray *)sectionIndexTitlesForTableView:(UITableView *)tableView 


- (NSInteger)tableView:(UITableView *)tableView sectionForSectionIndexTitle:(NSString *)title atIndex:(NSInteger)index

- (NSString *)tableView:(UITableView *)tableView titleForHeaderInSection:(NSInteger)section


The first method asks for an array of strings which it will use as index titles. You can find indexes A-Z vertically arranged on the rightmost side of tableView. Here you can decide either to give all the characters or just the ones in arrayOfCharacters.

In the second method you specify what should be the section number for the given index title.

In third method you provide the title for each section header. You can find in the first figure, a gray bar with a character appearing in it just above each section.

So lets implement these methods, add the following code:

- (NSArray *)sectionIndexTitlesForTableView:(UITableView *)tableView {

NSMutableArray *toBeReturned = [[NSMutableArray alloc]init];

for(char c = 'A';c<='Z';c++)

[toBeReturned addObject:[NSString stringWithFormat:@"%c",c]];

return toBeReturned;

}

- (NSInteger)tableView:(UITableView *)tableView sectionForSectionIndexTitle:(NSString *)title atIndex:(NSInteger)index {

NSInteger count = 0;

for(NSString *character in arrayOfCharacters)

{

if([character isEqualToString:title])

return count;

count ++;

}

return 0;// in case of some eror donot crash d application 

}

- (NSString *)tableView:(UITableView *)tableView titleForHeaderInSection:(NSInteger)section {

if([arrayOfCharacters count]==0)

return @"";

return [arrayOfCharacters objectAtIndex:section];

}


I think I have already explained the code. 

Before we build and run the project, we need to change the other tableView methods we created last time. Make sure these three methods look like these:

- (NSInteger)numberOfSectionsInTableView:(UITableView *)tableView {

return [arrayOfCharacters count];

}


- (NSInteger)tableView:(UITableView *)tableView numberOfRowsInSection:(NSInteger)section {

return [[objectsForCharacters objectForKey:[arrayOfCharacters objectAtIndex:section]] count];

}


- (UITableViewCell *)tableView:(UITableView *)tableView cellForRowAtIndexPath:(NSIndexPath *)indexPath {

static NSString *MyIdentifier = @"MyIdentifier";

UITableViewCell *cell = [tableView dequeueReusableCellWithIdentifier:MyIdentifier];

if (cell == nil) {

cell = [[[UITableViewCell alloc] initWithFrame:CGRectZero reuseIdentifier:MyIdentifier] autorelease];

}

// Set up the cell

cell.text = [[objectsForCharacters objectForKey:[arrayOfCharacters objectAtIndex:indexPath.section]] objectAtIndex:indexPath.row];

return cell;

}


I will try explaining a few thing here.    [[objectsForCharacters objectForKey:[arrayOfCharacters objectAtIndex:section]] count
Here we have first derived the character for the section. Then we used that character to obtain its corresponding array of names. And the count of names in the array will be numberOfRows in that section.
Rest should be clear.
Go ahead and run the project and you should see the screen similar to figure 1.

Also try adding more data into database and see how it looks.

Tuesday, March 3, 2009

iPhone Development: SQLite3 - populating table from database

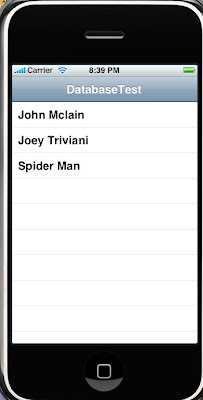
In this post I will be discussing how to create and use database on iPhone. The application will finally look like this:


So to start, create a new project, chose the template "Navigation Based" and name it as "DatabaseTest". We will be using SQLite3 database and for that we will need the libsqlite framework. Right click on frameworks->Add Existing. In the search bar type "libsql" and it will show you some 4 frameworks with same name. You have to choose "libsqlite3.0.dylib" whose size is 1.7MB.

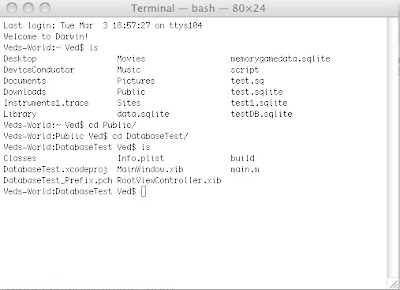
Now we will create a database that we will be importing into our project later. Open the terminal and navigate into your project directory. Execute ls to verify that you are in correct folder. You should see the following screen on your terminal.


Now to create database in your project, type the following command:
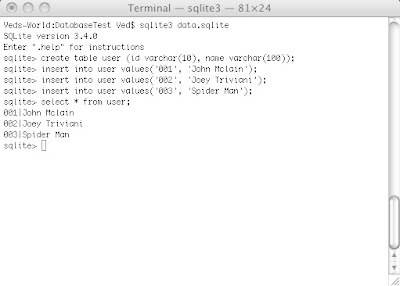
sqlite3 data.sqlite
This will create a database with name data.sqlite. Now create a table with name "user" in your database. Execute the following command: sqlite> create table user (id varchar(10), name varchar(100));

Now we insert some dummy data into the table. Execute following commands:
sqlite> insert into user values('001','John Mclain');
sqlite> insert into user values('002', 'Joey Triviani');
sqlite> insert into user values('003', 'Spider Man');


Check to see everything went fine.


Now we will import the database into our project. Right click on Resources->Add->Existing File and select data.sqlite.
This will add data.sqlite file into Resources folder.

Now we are ready to write code. Open DatabaseTestAppDelegate.h and import sqlite3.h


Open DataBaseTestAppDelegate.m file and add the following code:

- (void)createEditableCopyOfDatabaseIfNeeded {

NSLog(@"Creating editable copy of database");

// First, test for existence.

BOOL success;

NSFileManager *fileManager = [NSFileManager defaultManager];

NSError *error;

NSArray *paths = NSSearchPathForDirectoriesInDomains(NSDocumentDirectory, NSUserDomainMask, YES);

NSString *documentsDirectory = [paths objectAtIndex:0];

NSString *writableDBPath = [documentsDirectory stringByAppendingPathComponent:@"data.sqlite"];

success = [fileManager fileExistsAtPath:writableDBPath];

if (success) return;

// The writable database does not exist, so copy the default to the appropriate location.

NSString *defaultDBPath = [[[NSBundle mainBundle] resourcePath] stringByAppendingPathComponent:@"data.sqlite"];

success = [fileManager copyItemAtPath:defaultDBPath toPath:writableDBPath error:&error];

if (!success) {

NSAssert1(0, @"Failed to create writable database file with message '%@'.", [error localizedDescription]);

}

}


We have done nothing but created an editable copy of database into local document. Now add the following code in the same file:


+(sqlite3 *) getNewDBConnection{

sqlite3 *newDBconnection;

NSArray *paths = NSSearchPathForDirectoriesInDomains(NSDocumentDirectory, NSUserDomainMask, YES);

NSString *documentsDirectory = [paths objectAtIndex:0];

NSString *path = [documentsDirectory stringByAppendingPathComponent:@"data.sqlite"];

// Open the database. The database was prepared outside the application.

if (sqlite3_open([path UTF8String], &newDBconnection) == SQLITE_OK) {

NSLog(@"Database Successfully Opened :)");

} else {

NSLog(@"Error in opening database :(");

}

return newDBconnection;

}

Here we have created a class method which will be used by other classes to obtain the instance of database. We will see how this will be used in a short while. Mean while in the applicationDidFinishLaunching method add the following code:

- (void)applicationDidFinishLaunching:(UIApplication *)application {

// Configure and show the window

[self createEditableCopyOfDatabaseIfNeeded];

[window addSubview:[navigationController view]];

[window makeKeyAndVisible];

}


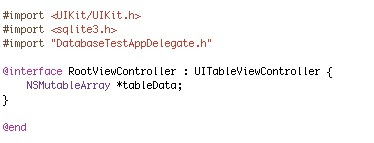
So, we have initialized the database. Now we have to use it. For this open RootViewController.h file and add the following code:


Now open RootViewController.m file and add following code:


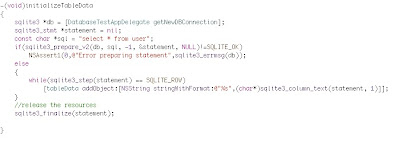
Here we have used the initialize database method to obtain a reference to the database. Using that we created a statement and executed it. Always remember to finalize the statement to avoid unexpected database errors. Now in the viewDidLoad method we will be calling this method. Add the following code:


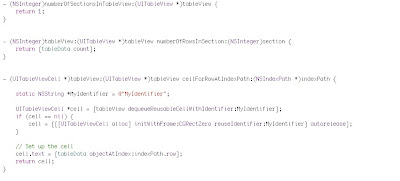
So we have read the data from database and also initialized tableData array. Time to display same into the table. Add the following code into the tableView delegate methods:


There you go! build and run the project and you should get the screen we saw in first image.
I have not covered very basic details, if you still need some I would suggest you to read my previous posts.
In next post I will be showing you how you can edit the table we created and also add new records to it and persist them into database.