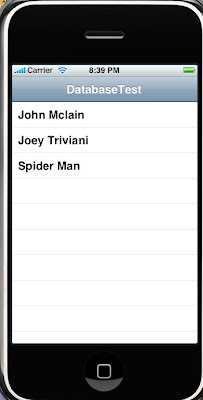
So to start, create a new project, chose the template "Navigation Based" and name it as "DatabaseTest". We will be using SQLite3 database and for that we will need the libsqlite framework. Right click on frameworks->Add Existing. In the search bar type "libsql" and it will show you some 4 frameworks with same name. You have to choose "libsqlite3.0.dylib" whose size is 1.7MB.
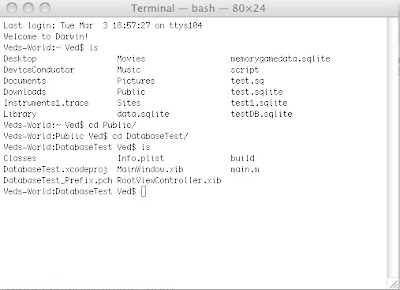
Now we will create a database that we will be importing into our project later. Open the terminal and navigate into your project directory. Execute ls to verify that you are in correct folder. You should see the following screen on your terminal.
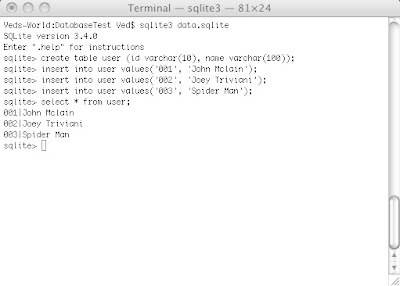
Now to create database in your project, type the following command:
sqlite3 data.sqlite
This will create a database with name data.sqlite. Now create a table with name "user" in your database. Execute the following command: sqlite> create table user (id varchar(10), name varchar(100));
Now we insert some dummy data into the table. Execute following commands:
sqlite> insert into user values('001','John Mclain');
sqlite> insert into user values('002', 'Joey Triviani');
sqlite> insert into user values('003', 'Spider Man');
Check to see everything went fine.
Now we will import the database into our project. Right click on Resources->Add->Existing File and select data.sqlite.
This will add data.sqlite file into Resources folder.
Now we are ready to write code. Open DatabaseTestAppDelegate.h and import sqlite3.h

Open DataBaseTestAppDelegate.m file and add the following code:
- (void)createEditableCopyOfDatabaseIfNeeded {
NSLog(@"Creating editable copy of database");
// First, test for existence.
BOOL success;
NSFileManager *fileManager = [NSFileManager defaultManager];
NSError *error;
NSArray *paths = NSSearchPathForDirectoriesInDomains(NSDocumentDirectory, NSUserDomainMask, YES);
NSString *documentsDirectory = [paths objectAtIndex:0];
NSString *writableDBPath = [documentsDirectory stringByAppendingPathComponent:@"data.sqlite"];
success = [fileManager fileExistsAtPath:writableDBPath];
if (success) return;
// The writable database does not exist, so copy the default to the appropriate location.
NSString *defaultDBPath = [[[NSBundle mainBundle] resourcePath] stringByAppendingPathComponent:@"data.sqlite"];
success = [fileManager copyItemAtPath:defaultDBPath toPath:writableDBPath error:&error];
if (!success) {
NSAssert1(0, @"Failed to create writable database file with message '%@'.", [error localizedDescription]);
}
}
+(sqlite3 *) getNewDBConnection{
sqlite3 *newDBconnection;
NSArray *paths = NSSearchPathForDirectoriesInDomains(NSDocumentDirectory, NSUserDomainMask, YES);
NSString *documentsDirectory = [paths objectAtIndex:0];
NSString *path = [documentsDirectory stringByAppendingPathComponent:@"data.sqlite"];
// Open the database. The database was prepared outside the application.
if (sqlite3_open([path UTF8String], &newDBconnection) == SQLITE_OK) {
NSLog(@"Database Successfully Opened :)");
} else {
NSLog(@"Error in opening database :(");
}
return newDBconnection;
}
Here we have created a class method which will be used by other classes to obtain the instance of database. We will see how this will be used in a short while. Mean while in the applicationDidFinishLaunching method add the following code:- (void)applicationDidFinishLaunching:(UIApplication *)application {
// Configure and show the window
[self createEditableCopyOfDatabaseIfNeeded];
[window addSubview:[navigationController view]];
[window makeKeyAndVisible];
}
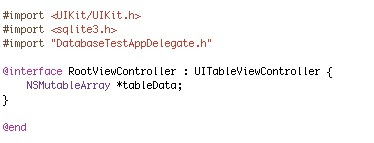
Now open RootViewController.m file and add following code:
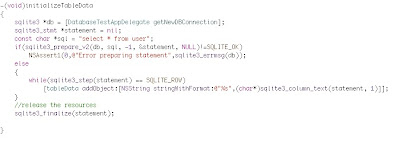
Here we have used the initialize database method to obtain a reference to the database. Using that we created a statement and executed it. Always remember to finalize the statement to avoid unexpected database errors. Now in the viewDidLoad method we will be calling this method. Add the following code:

So we have read the data from database and also initialized tableData array. Time to display same into the table. Add the following code into the tableView delegate methods:
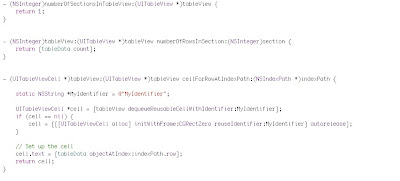
There you go! build and run the project and you should get the screen we saw in first image.
I have not covered very basic details, if you still need some I would suggest you to read my previous posts.
In next post I will be showing you how you can edit the table we created and also add new records to it and persist them into database.